How to Add Linear and Radial Gradients to SVG
Create multi-color fills, radial highlights, and transparent fades, or update the stops of an imported gradient.
In this guide 7 sections
To add a gradient to an SVG shape, select it in the SVG editor and change Fill style from Solid to Linear or Radial. Set the colors, stop positions, and opacity in the right panel, then export SVG to keep the gradient as vector artwork.
This guide creates a three-color linear fill and a radial highlight. It also explains how to edit an imported gradient without unintentionally changing its placement.

Choose linear or radial
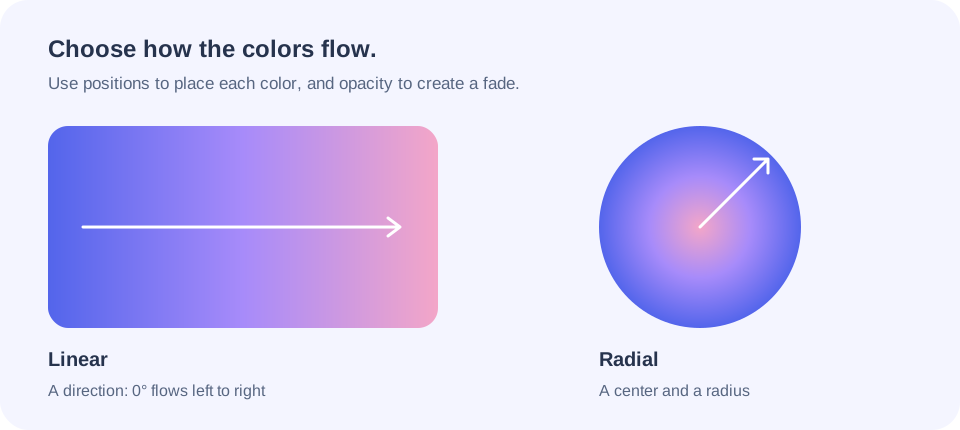
- Linear: colors change along a straight direction. Good for backgrounds, ribbons, and two-tone lettering or shapes.
- Radial: colors spread outward from a center. Good for highlights, soft glows, and round objects.
SVG supports gradients natively, so a smooth color blend does not require a PNG. The editor’s current gradient controls apply to fills; they do not create gradient strokes.
Create a three-color linear gradient
- Open the editor and add a rectangle from Shapes, or select a shape in an imported SVG.
- If the artwork is grouped, choose Ungroup & edit elements and select one object. Gradient controls are disabled for groups and multiple selections.
- In the right panel, find Fill, enable it if needed, and set Fill style → Linear gradient.
- Set Direction to 0° for a left-to-right blend on an unrotated shape. Try 90° for a top-to-bottom blend.
- Set the first stop to
#5365EBat 0% and the last stop to#F3A6C8at 100%. - Click Add color stop. Set the middle stop to
#A78BFAat 50%. - Leave each stop’s Opacity at 100% for an opaque blend. Use Reverse colors to reverse the color sequence.
A stop’s position is where that color occurs along the blend, not the size of the shape. Moving the middle stop from 50% to 25% makes the first color transition happen sooner.
Create a radial highlight
- Add or select a circle and choose Fill style → Radial gradient.
- Use a light color for the first stop and a darker color for the last.
- Set Center X and Center Y to 50% for a centered glow. Try 30% and 30% to move the highlight toward the upper left.
- Adjust Radius to spread or tighten the blend. Watch the artwork as you change it; a wide shape can produce an elliptical-looking fill.
To fade a shape away, keep the desired color and lower a stop’s opacity toward 0%. Stop opacity changes transparency at that point in the blend; the object’s overall opacity affects the entire shape.
Add, remove, and arrange color stops
The editor supports up to 12 stops when adding colors. Each stop has a color picker, a six-digit hex field, Position %, and Opacity %. Enter a hex value such as #14B8A6 for a precise brand color.
Remove an unnecessary stop with its × button. The editor keeps at least two stops for a normal editable blend. Start with two or three colors and add more only when they improve the design; closely spaced stops can create an abrupt band.
Edit an imported SVG gradient carefully
Imported gradients can use their own coordinate units, offsets, and transforms. Changing their colors, stop positions, or stop opacity preserves that placement. The editor displays a notice when the gradient uses imported geometry.
Changing the gradient type, direction, center, or radius fits a new gradient to the selected object. Use those controls when you want a new placement, and use Undo if the imported appearance changes unexpectedly.
The Recolor tab changes matching solid fills and strokes across the artwork. It leaves gradients alone; use these individual Fill controls for gradient colors.
Export and check transparency
Export SVG to retain gradient definitions and editable paths. Export PNG for a pixel image that can retain transparency. JPG has no alpha transparency and uses a white background when needed. Review the exported file over the background where you intend to use it.
Questions about SVG gradients
Why is Fill style disabled?
A group or several objects may be selected. Ungroup if necessary and select a single object. See the group and ungroup guide.
Can I create a gradient on the canvas background?
Create a rectangle covering the artboard, apply a gradient to it, and send it behind your other objects. This gives you an editable background layer.
Can I return to a flat color?
Yes. Choose Solid in Fill style and pick the color you want.
For the underlying SVG markup, see MDN’s SVG gradient reference. To build a complete composition, try a design starter.
Make it yours.
Keep this guide open and give it a try.